Tuesday, June 26, 2018

Easy Ways to Install Windows 8 / 8.1 Complete With Images Each Step


On this occasion, I will share a tutorial on how to install windows 8 / 8.1 easily, even for the layman too. Step by step I also explain in as much detail as possible so that you can understand exactly every step. But even so, make sure you listen to every step, do not let something you pass.

Between windows 8 and 8.1 is not much different. There may be slight differences between the two, such as navigation properties, search features, and tile sizes that have their own characteristics.

One of the most prominent features of windows 8.1 is, there is a start button on the taskbar menu, where windows 8 is not equipped with this feature. But still, the installation process is not much different, so you do not have to worry. Check out the following windows 8 installation steps:

Before starting install windows 8

  • As usual, prepare the DVD installer windowsnya. Suppose you want to install windows 8 with flash 
  • If the installed is a laptop, I strongly recommend that you plug in your laptop charger right now. Very risky when in the installation process or still halfway the installation process, uh suddenly the laptop died.

Setting BIOS to boot from CD / DVD

First of all you need BIOS settings to boot first from CD / DVD. When the PC or laptop was first turned on, the first booting is done from the HDD, so you must first setup it in the following way:

1. Turn on / restart your computer or laptop, then press DEL (Delete). To enter the BIOS menu, not all computers / laptops use the same keys.

 "Other buttons that you can use include F1, F2, Fn + F2, and so forth, try one."

2. The BIOS menu display will appear as shown below. Remember, well, the BIOS menu display on every computer / laptop is not all the same. After that, move to the Boot tab using the ◄ ► button.

3. As shown in the picture below, the position of Hard Drive or HDD is located on its own, it means the first boot is done from the HDD. Therefore, you must change it to boot the first time from CD-ROM Drive.

4. Select the CD-ROM Drive, then use the +/- button to move it to the top position as shown in the picture below.

5. Do not forget yes, insert DVD installer windows 8 into the DVDROM your computer / laptop. Save the configuration you have done by pressing the F10 key.

As I've said before, not every type of BIOS on each laptop is the same. So do not be surprised if the BIOS display used in this tutorial is different from the BIOS display on your laptop / computer. For more details about BIOS understanding and its types, you can read an article about the BIOS I've previously shared.

Steps to install windows 8

The steps to install windows 8 is also not much different from installing windows 10, although there are differences, and even then only a little. Well, consider carefully the steps as follows:

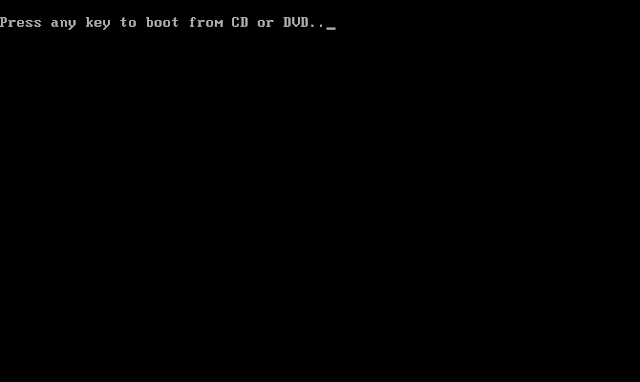
1. To start the installation, please press any key to make PC or laptop boot from CD / DVD. Oh yes, suppose you meet again with a display like this in the middle of the installation process, do not press any button, then you will repeat the installation process from scratch.


2. Select Indonesian (Indonesia) in Time and currency format. For others just leave the default, no need to change. After that select Next.


3. Will appear as shown in the picture below. Please select Install now.


4. The next step is to enter the product key windows 8, which is usually contained in one package the same DVD. Then select Next.


5. Do not forget to tick I accept the license terms, then select Next to proceed to the next step.


6. In this step, select Custom: Install Windows only (advanced).


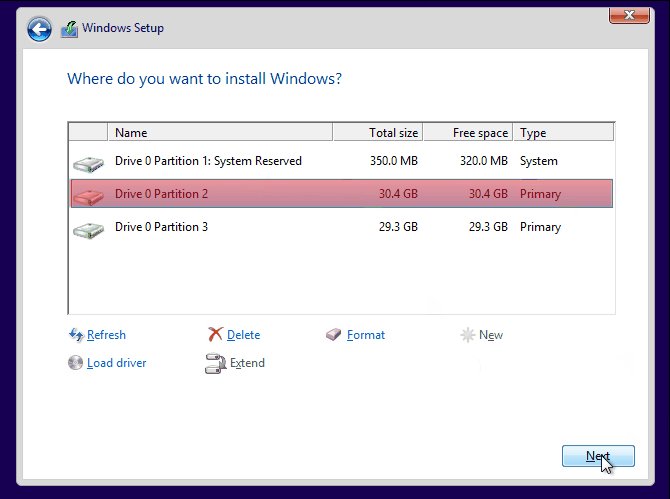
7. For those of you who want to re-install, where your computer / laptop has ever installed windows operating system before and want to data on other partisi not lost, just delete Drive 0 Partition 2 (partition C :) and Drive 0 Partition 1: System Reserved , then create a new partition again. After that select Drive 0 Partition 2 as the installation location, then select Next. More details, see the following gif images.

Note: For those of you who want to re-install windows 8, skip step 8-12 and for those of you who have never installed the operating system at all, or the HDD is still empty and smooth, please skip this step number 7.


8. As you can see in the picture below, that space HDD is still empty. What you need to do in the following step is to partition your HDD into multiple partitions (depending on your wishes, it can be 2.3 or more partitions).


9. To create a new partition, please select Drive options (advanced)> New, specify the size of the partition according to taste, then choose Apply. If your HDD is 320/500 GB, I recommend giving 100GB size because the following partition is a system partition (C partition :).


10. Next select OK for making system reserved partition.


11. Create a new partition again according to your taste. For the steps exactly the same as in step number 9 that is select Disk 0 Unallocated Space> New, then specify the size of the partition, then select Apply.


12. Select Drive 0 Partition 2 (partition C :) as the location of its windows 8 installation, then select Next.

13. At this step takes approximately 15 minutes and your computer / laptop will restart several times during the process. So do not worry because it is part of the installation phase.

14. Next name it on your PC, then select Next. In the following stages, you can also set the theme color to your taste.

15. Next select Use express settings.

16. After that select Create a local account.

17. Enter the username and password when necessary. No password is no problem, but if you want to not be arbitrary people can access your computer / laptop, it is advisable to give him a password.

For the Password hint field, enter a word or phrase that allows you to remember your password. Next select Finish.

18. Wait a few minutes, after which you will be taken to your desktop.

19. Done! You have successfully installed windows 8 or 8.1. The following display Desktop and Start Menu on windows 8.

Of course there are some things you should do after successfully installing windows operating system 8. Please visit the link below to find out what things you need to do after installing windows 8 / 8.1.

Monday, June 25, 2018

How to Install Windows 7


Installing Windows may sound like a daunting task but it is actually very easy, especially if we install newer operating systems such as Windows 7 Ultimate 32-bit and 64-bit. But no need to bring a computer or Laptop to a local expert to reinstall a simple one. We can install Windows alone! 

Windows 7 is the most easily installed Windows operating system. We are only asked a few important questions during installation, most of the preparation process is completely automated. Like other Windows versions, the "clean install" or "advanced" method is the smartest way to reinstall Windows 7 compared to less commonly installed "upgrades" or parallel installs.

How To Install Windows 7?

To start the installation process of windows 7 on the computer or laptop, we must set the initial boot in the BIOS Menu for the first PC to read DVD Windows 7 or Flashdisk.

How to Install Windows 7

To install windows 7, follow the steps below:
1.Turn on PC (Computer or Laptop), then go to Menu BIOS.

nyalakan laptop

Tips: In order to get into BIOS MENU, WHEN turn on the Laptop or Computer like the picture above, press continuously quickly F2 key, on some other brand laptop press Esc, F1, F10 or Del On Computer.

Note: On some brands of laptops may also while pressing the "fn" along with F1 / F2 etc, for the button to work.

2.Go to BIOS Menu. In the BIOS MENU set up the first boot.

menu bios

Note: The picture above is an example of entry into the menu "BIOS" or "Setup Utility", this display varies depending on the brand.

3.Arrange Initial Boot. Locate the Boot Tab Menu to set the First Boot.

bios setup

Tips: Point First Boot So CD-DVD or Flashdisk as you wish, This display also varies depending on the brand. Change "Boot" first on Menu "BIOS" To CD / DVD or Flashdisk, but if from Flashdisk change first boot to Flashdisk, it is necessary for "Booting" first read media CD / DVD Windows 7 or Flashdisk.

 Note: Especially for the first boot of the flash, it must first input flash before turning on the computer or laptop.

4.Save BIOS Settings. Click Exit and then Exit Saving Changes by clicking Yes.

save setup configuration

Tips: Computer or Laptop will immediately "Restart" from DVD. Do not Forget first input DVD Windows 7 "Installer" to DVD Drive, before "restart".

5.Start Booting First. The PC will start booting from the Windows 7 Installer DVD.

press any-key

Tips: Click Anything on the keyboard, for example click "Enter" and time is only 5 seconds, if 5 seconds ga in click, process will not happen, must "restart" again.

6.Wait for the process. In This step does nothing.

loading installation

7.Select a language. Choose Bahasa English, then Click Next.

setelan bahasa

8.Start Install Process. Click Install Now to start the installation.

install now

9.Confirm Approval. Click I accept the license terms, then Click Next. Tips: Click for Approval installation.

persetujuan

10.Select advanced options. Choose advanced or advanced options for installing windows 7 system files.

advanced install

Tips: In this Step, very important, Click "Custom advanced". This step means to install Windows 7 from scratch, so it will be like new, and delete all the old system.

11.Set the partition. Arrange the partitions as desired.


Tips: In this step Important To Set Partition to be installed new Windows 7. The picture above is an example of a Laptop that has 3 Partitions, First System Reserved, Both old Windows 7 alias (C :), and Third Data alias (D :).

Note: If the above picture on the box is empty, it means the hard disk is not readable, then the hard drive may be damaged or not good or the cable to the hard disk is not good or undetected.

12.Delete Old System Partition. Delete the previous Windows System Partition.


Note: With Delete Partition, the Old system (C :) will be deleted, and My Documents will be deleted entirely, because My Documents is included (C :). So kalo save Data later in data should di (D :) or (E :). Point the cursor to delete Partition by Click "Delete", then click OK - OK aja, until display in next picture.

13.Create a new Partition. Create a new partition with enough hard disk space or space.


Tip: Point Cursor on the partition that will be filled with new Windows 7, Click New. Then Click OK and OK. To note, here there is a value of how "Byte Hard Disk".

14.Install windows 7 on the new partition. Continue installation on New Partition.


Tips: Display will be like the picture above, then point Cursor On Partition to be installed new Windows 7 "Primary", Then Click "Next".

15.Wait for windows file transfer process 7. Start the Installation Process.

installing windows

Tips: Installation Process It really starts, if it is up to this step you can really relax, because the next will run Automatic. Do not click anything, just leave it to restart by itself. If At Expanding Windows files there is "error", it means laptop memory / computer is broken, try to repeat again from the beginning if "error". If current, Windows will restart automatically.

16.Wait for the advanced process. The installation process continues automatically, then it will restart itself.

auto-restart

Note: If using DVD does not do anything, but if using Flashdisk after the image is "restart" Flashdisk MUST be revoked.

17.Automatic restart.

press any-key

Note: After "Restart", in this step do not click anything, if clicked it will start again like step above. If you wear the flash no picture above, right dah revoked.

18.Let the process continue. Leave it alone do not click anything on this step.
updating registry settings

19.Advanced installation improvements. Leave it alone.


completing installation

Tips: Refining Windows Installation Process. Leave it alone, do not click anything, if gerakin "mouse" or drinking coffee.

20.Do not click on anything. The Windows Installation process is almost complete, and will restart automatically.
continue after-restart

21.Fill in the Data. Isiliah by creating a username.


user name

Tips: Fill in a Name for Laptop, Computer, free, then Click "Next".

22.Fill in the password if desired. Fill in Password to login to windows 7.

set password

Tips: No need to fill in, except Laptop or computer will use "password" or keyword, then click "Next".

23.Fill in the Product Key if it already has. Product key windows 7, click Skip if you have not already.

product key

Tip: If you already have a Windows 7 Code, type the code in the box provided, and click "Automatically activate Windows". If you do not already have the code, do not fill anything, Next "Next" will be "Skip", so Click "Skip".

24.Choose a recommendation setting. Click Use recommended settings.

recommended setting

25.Set the time. Setting the current time, adjust the time you want, then click Next.

pengaturan waktu


26.Done. Windows 7 installation process is complete.


desktop

Tips: For those who have not entered the code windowsnya "Product key" alias not activated, then perfect windows 7 is valid only 3 or 30 days depending on the edition, if not activated, windows display will turn black, and if left sometimes can damage hardware Laptop or Netbook, you should immediately activate Windows after Installation is complete. To activate (activation) windows 7 is actually on the DVD itself, if confused ask the seller or ask the more know, because the way windows 7 activation is different.

Every windows 7 installation should install windows-drivers such as Graphics, Audio, Network, and all related drivers in their brand, usually CDs / DVDs are given when buying a Laptop or Computer, if there is no download. But On some Laptop Brands, usually do not need also because it is integrated with Windows 7, and Driver must be installed so that Laptop or Computer running with as much as possible, then complete with supporting software.

Sunday, June 24, 2018

How to Install IDM for Beginners (Complete + Image)


IDM, downloader application made by Tonec Inc. has been touched many computer users around the world. With the help of this application, we can download various files easily and quickly. How to install IDM is quite easy and not complicated like installing applications in general.

A little bit of vent ya, almost all, more precisely 99% of my friends install this one application. Naturally, this application is very helpful in downloading activities. But there are still some who do not understand well about how to install IDM on their computer / laptop. Through the following article, I will explain as detailed as possible steps to install IDM easily you can see below:

Steps to install IDM

1. Please download the application here
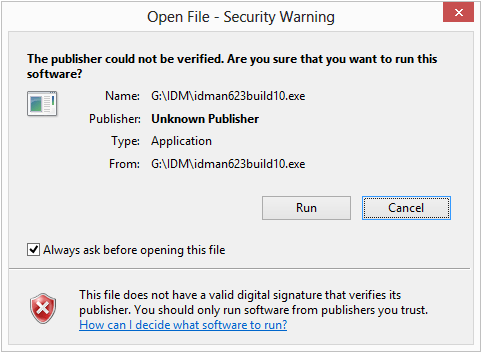
2. Once you have successfully downloaded, open the application and select Run as shown in the following picture.

cara menginstall IDM

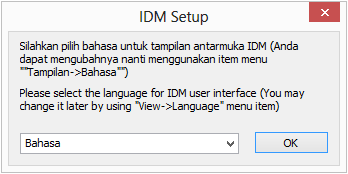
3. Select Language if you want to select English. After that select OK.

step kedua menginstall IDM

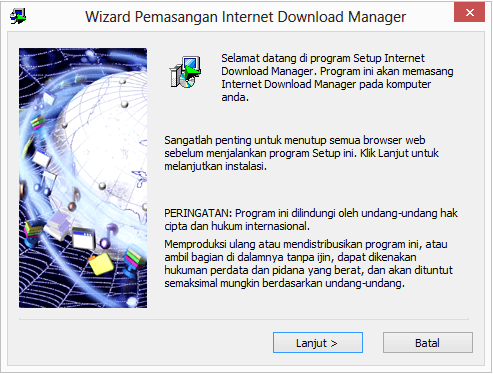
4. Select Continue to move on to the next step.

step ketiga install IDM

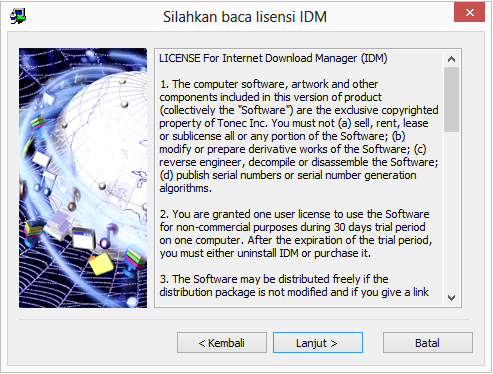
5. Select Continue to approve the license provided by IDM.

setujui lisensi

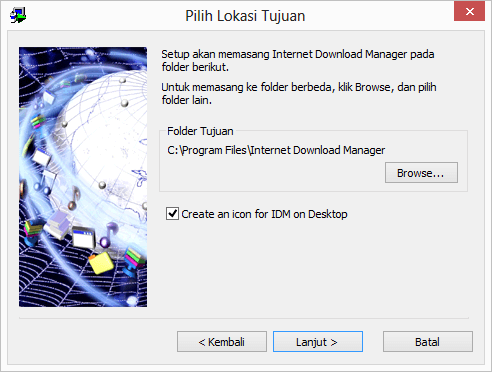
6. Automatically, the installation location IDMnya located in the folder C: \ Program Files \ Internet Download Manager. Please select Next to move on to the next step.

pilih lokasi instalasi

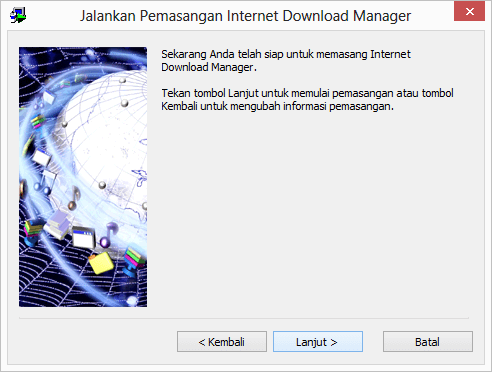
7. Select Continue.

step keenam

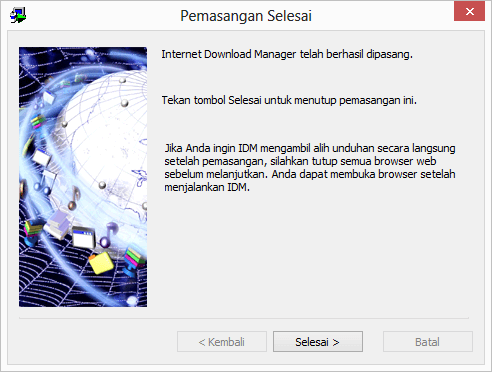
8. Next, select Done.

step ketujuh

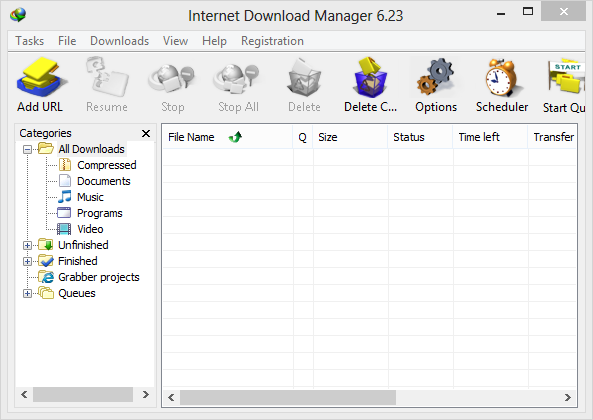
9. IDM has been successfully installed on your computer. Next you will get a notification like the following picture.

tampilan IDM

Understanding Motherboard With Functions and Types of Motherboards


When unpacking the contents of your computer, then you will find a large circuit board with a variety of computer components that are attached to it, the board is called the motherboard. So, what are the functions of this motherboard so it is said to be the backbone of a computer? And what are the types of motherboards?

Here is an explanation of the definition of motherboard and its functions and types of motherboards:

Understanding Motherboard

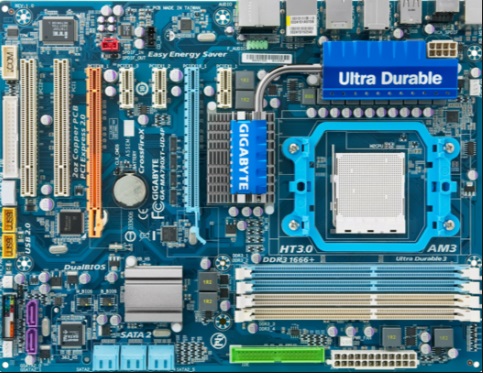
The motherboard (or so-called mainboard, systemboard, logic board, baseboard or mobo) is a printed circuit board (PCB) that acts as a backbone on a computer, because the motherboard provides an electrical connectivity called a bus so that all external components and devices on the motherboard it can connect.
Hasil gambar untuk pengertian motherboard

On this motherboard all the components of the computer installed, such as CPU, RAM slot, PCI slot and USB port. In addition the motherboard also has the ability to control devices such as hard drives, DVD drives, keyboards and mice. The point is this motherboard that makes all components of your computer able to cooperate with each other.

Motherboard Function

The role of the motherboard as a computer spine is not unreasonable, because the motherboard has a variety of functions. In addition to its main function is as a medium that holds the components on the computer, the motherboard also serves to set the basic input / output system (BIOS) on the chip read-only memory (ROM). The BIOS code is a firmware, which the firmware will not lose even if the computer is off and also can not be changed by normal operating system or application software.

In addition, when you look at the motherboard there is a collection of slots that allow the use of components or external devices that can increase the flexibility of the computer itself. The device in question is the printer, keyboard, mouse, audio jack, external hard disk, or game stick. The device can be connected to a computer by connecting it directly to the motherboard using the ports that have been provided.

Types of Motherboards

Motherboards come with a variety of types and shapes, recognizing the type of motherboard you have is important, especially when you are going to build or upgrade a computer. Therefore consider the following explanation of the types of motherboards:

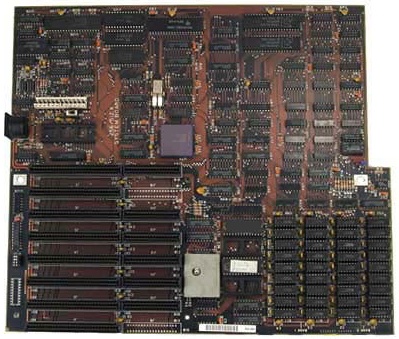
1. Motherboard AT (Advanced Technology)
fungsi motherboard
The AT motherboard was a type of motherboard first introduced by IBM in August 1984, then widely used in the 1980s. This type of motherboard has a size that is quite large that is 12 x 13.8 inches, size large enough that it will not fit on the mini desktop.

Another problem with AT motherboards is the difficulty of installing, troubleshooting and upgrading because the distance between each component is very close.

Another version of the AT motherboard is the Baby AT Motherboard which has a smaller size of 8.5 x 13 inches. But at this time AT / Baby AT type motherboards have been very rarely used, and has been replaced by newer types of motherboards like ATX.

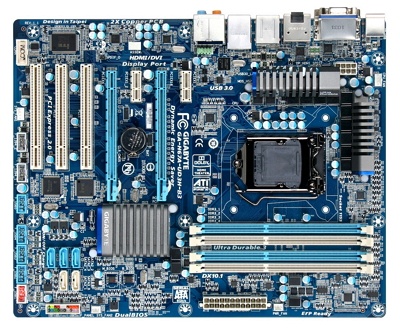
2. ATX (Advanced Technology Extended)
ATX (Advanced Technology Extended)
ATX motherboards are a type of motherboard developed by Intel in the mid-1990s which is an improvement on the previous type of motherboard AT.

In addition to the increase in the size of the motherboard is getting smaller. ATX motherboards are also increasingly easy to use, in this case installation, troubleshooting and upgrading, as well as improvements in I / O and processor technology and system production costs. This is what makes this type of motherboard is still a popular use in 2017 this year.

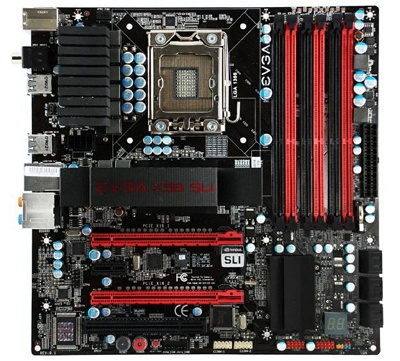
3. Micro-ATX
pengertian motherboard
Micro-ATX is the same as the ATX type, the benefits offered are the same, the only difference being that of smaller motherboards, this is done by reducing the number of I / O slots supported on the motherboard.

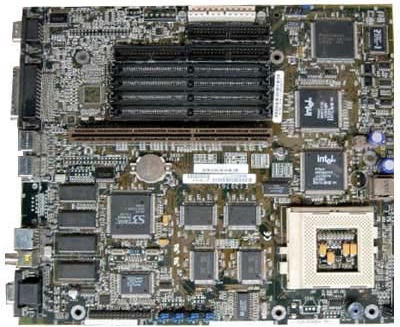
4. LPX (Low Profile Extended)
jenis-jenis motherboard
The low profile motionboard extension was created after the AT motherboard in the 1990s. This type of motherboard is designed for use on Slimline or low profile casing, which is designed in such a way to reduce the use of space and space costs.

What distinguishes this type of motherboard from another is on the riser card which is a straight-mounted card used to install an expansion slot. It aims to reduce the height of a casing, since generally the height of the computer case is affected by the expansion card itself. However, this is not recommended, as it may affect the cooling system on your computer.